Programming the ODROID-GO: Storage (Part 4)
The ODROID-GO has a MicroSD card slot that would be useful to be able to load assets from (sprites, sound files, fonts) and possibly even save game state to.
The card reader is connected via SPI, but the IDF makes it simple to interact with the SD card by abstracting away the SPI calls and allowing us to use standard POSIX function calls like fopen, fread, and fwrite. Underneath it all is the FatFs library, so the SD card needs to be formatted in standard FAT format.
It’s connected to the same SPI bus as the LCD but uses a different chip select line. When we need to read or write from the SD card (which will not be very often), the SPI driver will switch the CS signal from the display to the SD reader and perform the operation. This means we cannot do any SD card operations while sending data to the display, and vice versa.
At the moment we’re doing everything in a single thread and we’re using blocking SPI transmits to the LCD, so there should be no way for an SD card transaction and an LCD transaction to occur at the same time. It is also likely that we will load all assets during startup anyway.
ESP-IDF Modification
If we attempt to initialize the SD card interface after initializing the display, we’ll run into a problem that causes the ODROID-GO to not boot. ESP-IDF v4.0 does not support sharing the SPI bus when using it with an SD card. They recently added the functionality but it hasn’t been included in a stable release yet, so we’ll make a quick modification to the IDF ourselves to get it to work.
Comment out line 303 of esp-idf/components/driver/sdspi_host.c:
| |
With this change, we’ll still see an error during initialzation but it will no longer cause the ESP32 to reset because the error code is not being propagated up.
Initialization


We need to tell the IDF which pins of the ESP32 are connected to the MicroSD card reader so that it can appropriately configure the underlying SPI driver that actually communicates with the reader.
Once again, the schematic uses the generic labels VSPI.XXXX but we can follow them to the true pin numbers on the ESP32.
| |
Initialization is similar to the LCD but instead of a general SPI configuration struct we use sdspi_slot_config_t which is for an SD card connected on the SPI bus. We configure the relevant pin numbers and mounting properties of the card in the FatFS system.
The IDF documentation suggests not using the esp_vfs_fat_sdmmc_mount function in production code. It’s a wrapper function that does a lot of things for us, but for now it works fine and will probably work fine forever.
The "/sdcard" parameter of that function is setting a virtual mount point for our SD card that we will then use as the prefix of filenames when operating on files. If we had a file on the SD card named “test.txt”, then the path we would use to reference it would be “/sdcard/test.txt”.
Once initialization of the SD card interface is complete, it’s trivial to interact with files: we can just use the standard POSIX function calls which is very convenient.
It's possible to enable Long Filename Support through make menuconfig but for now we'll just continue on as is, keeping in mind the 8.3 limitation.
Demo

I created a (terrible) 64x64 sprite in Aseprite using only two colors: full black (pixel off) and full white (pixel on). Aseprite doesn’t have the option of RGB565 color or exporting as a raw bitmap (i.e., no compression or image headers), so I exported as a PNG as a temporary format.
I then converted the data with ImageMagick to a PPM file which turned the image into the raw uncompressed data with a simple header. I then opened the image in a hex editor, removed the header, and converted the 24-bit color into 16-bit color by replacing all instances of 0x000000 with 0x0000 and all instances of 0xFFFFFF with 0xFFFF. Endianness is not a concern here because 0x0000 and 0xFFFF do not change with endianness.
You can get the raw file here.
| |
First we open the key file which has the raw bytes and read that into a buffer. This is not how we will handle sprite asset loading in the future, but it works well enough for the demo.
| |
To draw the sprite, we iterate over the contents of it. If the pixel is white then we draw it with whatever color we’ve set using the buttons. If it’s black then we consider it as background and don’t draw it.
To test image writing we’ll move the key somewhere on screen, change the color, and then write our framebuffer to the SD card so that we can view it on the computer.
| |
Pressing the menu button will save the contents of the framebuffer to a file called framebuf. It will be the raw framebuffer so the pixels will still be in the endian-swapped RGB565 format. We can use ImageMagick again to convert that format to a PNG for actual viewing on a desktop.
| |
Of course we could implement a BMP/PNG read/writer and avoid all of the ImageMagick stuff, but this is just demo code. I’m not sure what kind of file format I want sprites to be in just yet.
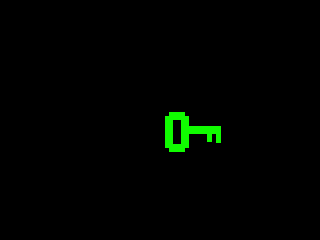
And there it is! The framebuffer of the ODROID-GO viewed on a desktop computer.
Source Code
You can find all of the source code here.
Further Reading
Last Edited: Dec 20, 2022