Pac-Man: Final
It’s now been two months since my last update and I’ve since discovered I get more enjoyment out of working on the engine side of things than the gameplay and design side. A valuable lesson because it frees me from the burden of thinking I need to make a good game. Instead I can make toy games while working on engine features.
With that understanding, I no longer have the goal of building a complete game. Instead I will resume my old pursuit of creating a (limited) game engine for learning purposes, and creating small inconsequential games with it to test its capabilities as I go.
I will likely extract a lot of the code I wrote for for the Pac-Man experiment, but it will need to be heavily modified because I originally wrote it with the intent of it being used solely for one project without scalability in mind.
Regardless, I’d like to share some of what I learned the past few months in case it proves useful to someone else.
Engineering
Architecture
In other projects I’ve separated the platform code (i.e., the code that has all of the SDL function calls doing things like setting up windows and reading input) from the game code by having some sort of platform.c file that has functions like create_window() and poll_input().
Inspired by the architecture of Handmade Hero, I decided to flip everything around so that there is a main.c which contains the platform code and game.c which contains game-related functions that are called from main(). Inside of main() it initializes SDL, creates the window, and enters a while loop where it calls update and render functions from the game side.
In short, rather than have the platform be a service to the game, the game is a service to the platform. The platform provides the game with dt, input, etc, and the game does its thing.
That ends up with something that looks like the following main() function, where after all of the initialization stuff it enters a while loop where it polls input and calculates dt and then calls into the game. The game returns when it’s done back to main() and the cycle repeats.
| |
Memory
During game startup I load all of the assets from files into memory, but I don’t like requesting memory dynamically from the operating system if I don’t have to. Any request could fail, there is an overhead to the system calls involved, and it’s comforting to know that if the game boots up successfully then it should never run out of memory. Instead I ask the OS for a big chunk of memory at the beginning and I use that throughout the rest of the game’s operation. That way if it fails, it fails early and in one place.
I chose to allocate three pools of memory: engine, game, and scratch. I separated the engine data from the game data mostly for diagnostic purposes as it was useful during development to view how much memory the engine side was using versus the gameplay side.
The scratch space is for anything that only needs to persist for a short period of time as it will be overwritten at some point. I used it mostly for reading data from files before copying the data over into permanent storage or sending it to the GPU.
| |
I wrote a few months ago about my solution for a temporary memory allocator but this time I opted for something even simpler. Since I only needed the memory when loading and then I stored it somewhere else (either in a different section of memory or on the GPU), I instead just incremented a pointer as I allocated memory from the pool. Then, if I hit the end of the pool, it would loop back around to the beginning and overwrite old data, assuming that it was no longer needed.
For a sanity check, I logged a debug message when the scratch memory looped around just to alert me that it happened in case anything strange occurred because of it (which saved me a few times).
| |
This was primarily useful when loading assets from the data file, such as a mesh:
| |
Live Code Reloading
I considered adding support for a scripting language (e.g., Lua) because it’s nice to be able to modify gameplay code and see the game change without needing to recompile anything. This is one of those features that makes certain game engines nice to use. A lot of gameplay programming is tweaking numbers and seeing how it feels.
Integrating a scripting language was more work than I wanted to spend though and it necessitates switching back and forth between two languages: that of the engine and that of the gameplay.
Again inspired by Handmade Hero, I decided it would be simpler to separate the game (a shared library) and the platform (an executable). The executable links against the library dynamically at runtime.
Inside of main(), it monitors for changes to the game library file and reloads the shared lib if it detects a change in the write-time, and then it reassigns the function pointers of all of the engine’s external functions: game_update(), game_render(), etc.
The time it takes to compile the game library is a fraction of a second so I get the dynamic benefits of a scripting language without the trouble.
To keep game state between reloads requires that the platform layer owns the memory and passes a pointer to game_update() and game_render(). That way it doesn’t matter if the game library is reloaded and addresses change: the memory it uses is the same.
This is where the memory_t struct mentioned earlier comes into play. The platform layer allocates it and supplies a pointer to it to the game which does with it whatever it wants.
| |
At start it finds the functions in the game library and stores their addresses. Every frame it monitors for changes to the library file by comparing modification times and, if it detects a change, it reloads the library and the function addresses. Error checking has been omitted for brevity.
I decided to remove the concept of the game library in release builds and instead pack everything into one executable to keep things simpler when shipping the game, because the benefit of keeping game code in a dynamic library is really only during development.
Here is a simple example showing the ability to modify what diagnostic text is being displayed while the game is running:
Live Shader Reloading
In addition to code reloading, it’s useful to be able to modify shaders while the game is running and see the results live as you tweak different values to achieve a certain look or effect. And indeed the mechanism is very similar: monitor the modification times of each of the shader source files and, if a change is detected, destroy the old shader and recreate it.
| |
Again I opted to enable this functionality only in Debug builds. Furthermore, I made it so that in Release builds the shader sources would be embedded into the executable rather than loaded from disk. This prevents unintentional (or intentional) changes to the shader, and it also reduces the number of files that must be shipped with the game.
Here is an example of tweaking some of the ambient light parameters live:
Live Asset Reloading
Another useful form of live reloading is that of the asset data. Because I used Blender as a level editor, I never knew how an asset would really look until I exported it from Blender and then loaded it into the game. I got tired of closing the game, re-exporting from Blender, and then opening the game again, so I implemented basic live asset reloading.
The asset system I used was dead simple because I knew I had no need for anything more complex: my Blender export script packed everything into two binary files.
The first binary data file included all of the visual data needed for rendering and scene description: meshes with their vertex data interleaved and indices correctly set up, materials with their textures unpacked from PNGs into raw bytes, object transforms, light locations, and some metadata.
The second binary data file contained all of the audio data: audio sources (position, type, etc) and the sounds themselves as raw bytes. I split the audio into a separate file because it was largest and took the longest to export. I didn’t want to reload it on the fly because of the second or so it took for the Python script to convert the data, and changing an audio stream in the middle of playing causes problems.
On the Blender side, it meant creating a hook into the post-save procedure to run my export functions every time the Blend file was saved. On the game side, it again meant monitoring the modification time on the data file and reloading all of the data if it changed. And again disabling that functionality for Release builds.
| |
Here is a demonstration of modifying a scene, adding and deleting objects, and modifying their transforms:
Jumbo Build
I’ve been using jumbo builds in my small personal projects for the past year or so, and I’ve explained many of the pros and cons here.
The gist of the setup is that is an all.c file which includes all of the other files that are needed to build the game. I logically separated the source into two categories: engine (logging, math, data structures, rendering, etc) and game (logic, menu systems, etc).
That ends up looking something like this:
| |
Then building the game is as simple as compiling that single all.c file.
Technically you don’t need to even have headers like I do in the snippet above, but separating them that way can help readability (keeping the “interface” in the headers), and also helps with ensuring all necessary types are defined ahead of time before the source files that reference them are included later on.
The output of compiling the all.c is a shared library that can be dynamically reloaded, and so a separate file is needed to get the actual executable: main.c, which is a separate compilation target and a single file. It just needs to include common.h.
I always try to keep a file called main.c at the root which contains main() so it’s obvious where execution begins. It’s frustrating to have to dig to find the program entry point when attempting to understand a new codebase.
I mentioned earlier that I disabled the whole game-as-a-library thing for Release builds. That meant compiling only main.c in the Release build (using CMake logic) and including all.c at the top of it.
| |
common.h is included in all.c, so it doesn’t need to be included again in main.c for Release builds.
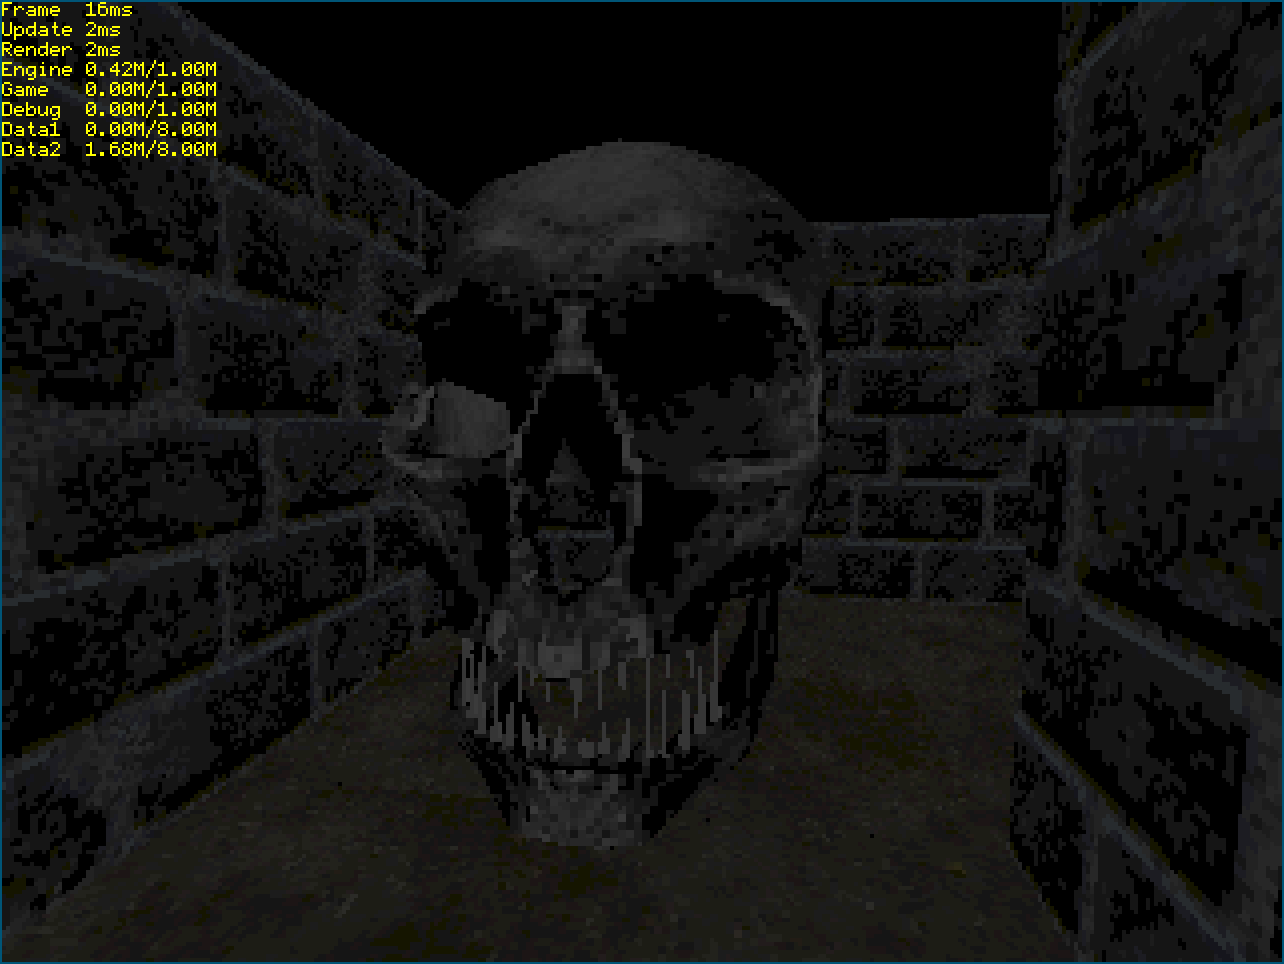
Retro Rendering
I set out from the beginning with the goal of creating a retro aesthetic with the hopes that it would be easier to create, easier to render, and scratch a nostalgic itch.
To achieve that, I rendered the scene to a small texture (320x240) and then stretched that texture onto a quad that fills the entire window/screen. That worked well to achieve the blocky, aliased look that I was going for.
| |
Then rendering meant binding the framebuffer, rendering the geometry, unbinding the framebuffer, and then rendering the framebuffer’s texture to a quad that fills the screen.
| |
All of that results in nice chunky texels with harsh aliased edges:
The textures also need to be low-res, and the models need to be low-poly, both of which I’ll talk about later.
Diagnostics
I wanted to have some diagnostics on screen early so I did very primitive text rendering which wasn’t robust enough for the final UI (static font that couldn’t scale dynamically) but it worked well for debug stuff.
I first found a free font which I passed through a font texture atlas generator to get a PNG of the packed glyphs. I loaded that into GIMP, flipped it upside down to match OpenGL’s texture orientation, and exported the image as a grayscale image (background is black, text is white). Finally I used Imagemagick to convert the PNG to raw bytes and used xxd to generate a C array of the bytes.
All of the font data (positions, spacing, etc) lives inside of a header file.
| |
Rendering a font meant creating quads on the fly with the right spacing, assigning the correct UV coordinate, and sending them off to the GPU for rendering.
| |
The first thing I used the text for was reporting timing: update, render, and total (locked to 16ms).
The timings are calculated inside of main(). The fact that main() calls into the game makes it very simple to time all of the different stages: just sample the time before the function call and after and take the difference, then pass that value to the function that draws the diagnostics on the screen.
| |
Blender Export
Blender makes a very capable level editor if you leverage its Python API, and writing Blender scripts is a lot less work than creating a level editor from scratch.
I wrote an export script that loads in the scene data (meshes, textures, object location, audio sources, etc) and serializes them to a binary file with a specific layout. Then during game startup I load the file.
At first everything was serialized to a single file called data.bin which contained mesh data, raw texture data, scene data, and raw audio data. This had the benefit of the game not needing to do any sort of runtime processing (e.g., decompressing PNG or Vorbis) with the downside of a large file.
But the game is small and the assets are small so everything can be loaded once and stay in memory throughout the duration of the game. This is one of those instances where my programmer instincts told me to optimize everything and make a fancy asset system with decompression, loading-on-the-fly, etc. That’s unnecessary for this game and so I didn’t.
Eventually I began exporting two files from Blender: one for audio and one for everything else. The processing and writing of the WAV data took longer than I wanted so I made the concession of splitting the two so that I could export each separately if I wanted fast iteration time.
Then I was able to have the game monitor for asset file changes and Blender to re-export everything but the audio on every scene file change. This allowed me to arrange things in Blender, save, and immediately see them in the game.
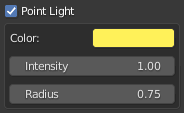
To help tag objects in the scene with metadata, I created a custom panel that allowed me to add data to objects and then access the data during export. For example, a music track is just an Empty object tagged as Audio Source with an audio type set to Music, and a path to the file specified.
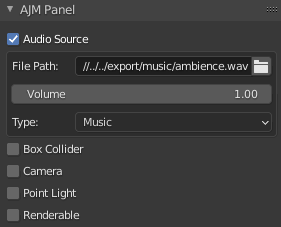
Some other types (shown in the image) are Box Collider, Camera, Point Light, and Renderable. Blender’s Python API is even nice enough to let you leverage things like a color picker, which is useful for something like configuring a light.
Renderable is just a flag that says an object has mesh and material data that should be exported which isn’t true of everything.
Here is an example showing lights being exported from Blender with color, radius, intensity, and position:
Collision Detection
Collision detection can get complicated. I have a book about it that spans hundreds of pages, full of different algorithms for different types of objects. I wanted to avoid the trouble if possible so I tried to think of simple solutions.
The game is rendered as 3D but world is essentially 2D. The player and enemies move through the maze at a fixed Z value; only the X and Y values change. The walls and items don’t move at all; they have a fixed X, Y, and Z.
A simple collision detection scheme that can work well for many things (until you need something more complicated) is the classic Axis-Aligned Bounding Box (AABB) which is a box that has no rotation applied; i.e., X-, Y-, and Z-axis are aligned to the X-, Y-, and Z-axis of the world coordinate space.
Using AABBs allows for simple math because you can use the Separating Axis Theorem (SAT) check. The SAT only determines if a collision occurred, it does not tell you how much (things get more complicated when you need to resolve collisions by moving objects so they aren’t touching anymore). However, for my uses it was fine because I just wanted to know if the player hit powerups, enemies, etc.
One way of defining a (2D) AABB is something like this:
| |
The bounds of the box are then easy to calculate as just the origin plus or minus the extents:
| |
Another way of defining the AABB is the position of a corner and then the full widths, but I find it more natural to think of the box’s origin as being at its center.
A collision between two AABBs is then a series of SAT tests, where each has the possibility of an early out returning a false collision (a nice benefit of SAT):
| |
Giving the player and the items each an AABB, and doing collision checks between them, made it easy to know which item (if any) the player was touching. I checked the player’s AABB against every item in a linear fashion because it was fast enough. When it isn’t fast enough you need some sort of acceleration algorithm to limit how many comparisons you’re doing (going from O(n) to something like O(log n)).
For the walls, I blocked out the areas that should never be entered and checked the player’s AABB against each of them. If a collision was detected between the player would enter those with their attempted movement, I simply didn’t allow the movement.
The trouble is doing what’s called slide and collide which is expected of any good first-person movement system. You expect to hit the wall and still be able to slide across it in the other direction (something you probably take for granted in every FPS you play), but I never got around to implementing it.
First-Person Camera
I created a first person camera last year for an abandoned project and copied the code over to this project mostly verbatim because I thought it was good to go.
It wasn’t until I was walking through the maze and turning corners that I realized something didn’t feel right.
If I looked at an object and moved the camera, I would circle around the object instead of looking left and right as if I were turning my head. I spent multiple hours trying to narrow it down and had no luck.
I thought I’d exhausted all possibilities until finally I compared my perspective projection matrix with the one from a book I have on rendering.
I had an innocuous looking 1.0f in Column 3 Row 3. I had made an error when I copied the projection matrix from the book many projects ago and the bug had been lurking there ever since. I changed the 1 to a 0 and everything was good.
| |
Finally the first-person camera was correct.
Enemy AI
AI is another complicated topic so I tried to simplify it. The ghost AI in the original Pac-Man was fairly simple but the combined behavior of the four ghosts together seemed like a complex system. So I tried to do it in a way that might have been done in the 80s.
There are four AI behaviors that are required but I only implemented one of them. The enemy moves forward until it hits either an intersection or a wall. At that point it determines whether the player is to the left or the right and turns in that direction. Repeat.
The gist of the logic is done with the dot product. When an enemy reaches a point where it can make a turn, a calculation is done to see where the player is in relation. It then turns either left or right, or it continues straight. It’s unable to do a 180-degree turn. The end result was a pretty stupid enemy.
Lighting
My lighting needs were pretty simple: I wanted each of the items to emit a small glow, which meant treating them as point lights with emissive textures (i.e., they aren’t affected by lighting themselves). I also wanted the maze to get darker as you collect more items.
The trouble is that there can be up to 300 light-emitting pellets alive at any time which is far too many to send to the GPU in the conventional form of a bunch of uniform data. It was interesting to see that I was able to do that brute force approach without issue on my integrated Intel GPU but ran into issues when running on Windows with an NVIDIA RTX 3070Ti.
I ended up implementing a culling algorithm that detected which pellets were in the line of sight of the player and only sent those off for rendering which brought the maximum number down to something around sixteen. It shot a ray from the camera’s position out the front and checked to see if walls were occluding the coins in the area and didn’t render them if so.
Another issue with the lighting was that I wanted the maze to get darker as the pellets were picked up and their light disappeared, but I found that the maze was much too dark once the pellet count became low. If I adjusted the ambient factor to compensate for that then the maze was too bright when the pellets were around.


The solution for that was tweaking the ambient lighting based on the number of pellets so that as pellet count went down the ambient factor would go up.
I also considered the idea of having the only light be a sort of cheap flashlight but decided it didn’t work very well.
Stereo Audio
Audio programming is rarely talked about and that’s a shame because it’s very unforgiving and painful if you don’t know what’s going on. If you mess up even a little bit it causes very unpleasant noises which are often hard to debug. A slight bug in your graphics code can cause something to render strange or a color to be wrong, but a slight bug in your audio code is often unforgivable.
SDL’s audio functionality requires that you set up the hardware first by telling it the format you intend to use: sample rate, data type, channels, etc. You then must make sure that all of the sounds you play match that format or things will go wrong. I chose to use a sample rate of 8000 because it made for a muted low-fi sound that I liked. And each sample was a two-channel float.
SDL also requires that you provide it with a callback function that it can call whenever it needs more audio data to send to the hardware, which means you must also tell it how many samples you want the audio buffer to hold. This is deceptively important.
If you set the sample value too low then SDL might call the function too often and the thread that the audio is running on might not be able to fill the buffer fast enough which will cause audio problems.
If you set the value too high then you introduce latency. This is most noticeable on sound effects where you expect to hear a sound within a few milliseconds of picking up an item but instead it plays later and ruins the illusion.
From what I can tell there are no good solutions to this problem, or at least no simple ones. You can change the buffer size and find a good balance on one machine that is not good on another. I’m sure advanced engines (or audio libraries) go through a lot of trouble of managing all of those concerns to ensure audio works well on all platforms.
This blog post from Our Machinery does a good job of explaining it.
For me, the setup looked like this:
| |
At first I just implemented a basic mono mix that output the same data to both the left and right speakers, which is good for music that have no position in 3D space. SDL has a library called SDL_mixern extension that can do basic audio mixing for you, but I opted to do it myself instead to learn more about audio programming.
The callback loops through all sounds that should be currently playing, combines them together, and puts the new value into SDL’s buffer. Basic audio mixing.
| |
Which improved the ambience quite a bit:
Later I implemented a very crude version of spatial audio which determined which side of the player an audio source was on via the ever useful dot product and then balanced each ear respectively. It worked okay but the attenuation algorithm didn’t take into account occlusion, so an enemy behind a wall sounded like it was close because there was no muffling of its output.
| |
Even that crude and flawed implementation did wonders for the atmosphere:
Data Structures
I knew that by using C I was throwing away the useful algorithms and data structures that were part of the C++ standard library (vector, map, etc), but that was also the point. Using C forces you to consider whether there is a way of achieving your goals without resorting to something like a list or a hash map which leads you to come up with some interesting and novel solutions to problems. If you do decide that one of those is necessary, you can then think of ways to do them in a C-style way.
For example, it’s possible to make a queue using an array instead of a linked list of nodes that are allocated from the heap and point to each other.
| |
This about as simple as it gets, although some additional logic is needed for the real implementation: ensuring head and tail wrap around to the beginning of the array, checking for a full array, etc.
| |
The real issue with C, of course, is that you don’t get the benefit of generics so you would need a separate queue for ints, floats, chars, etc, which is a good argument for choosing to use C++ with a limited subset of features such as (minimal) templates, math operator overloading, function overloading, and namespaces.
Zero-Is-Initialization
Another interesting approach that I picked up from Handmade Hero was the idea of what Casey Muratori calls Zero-Is-Initialization (ZII) which means designing things such that simply assigning zeroes to things is enough to initialize them. This lets you initialize a structure simply by doing = {0} in C or = {} in C++ which sets all of the fields of the struct to zeroes.
An example of this might be something like an audio struct with an enum that specifies the type of audio: music or sound effect. You can set the first element of the enum (which is 0) to some default type that does nothing. And if you use handles to refer to things rather than pointers, you can define a handle of 0 as being null (or invalid) as well.
| |
Then if you declared an audio source and attempted to play it without filling out the structure properly, the audio system would play nothing because it is also set up to handle (or ignore) zeroes properly.
| |
Furthermore, even if the type was set to SFX or Music, the asset request wouldn’t return anything because the handle is 0 which I defined as a null (i.e., do nothing) handle. And the volume is 0.0 which would produce silence.
Basically, if you can think of ways that zero can work in your favor, ZII can simplify your life later down the road.
Asset Creation
Maze Generation
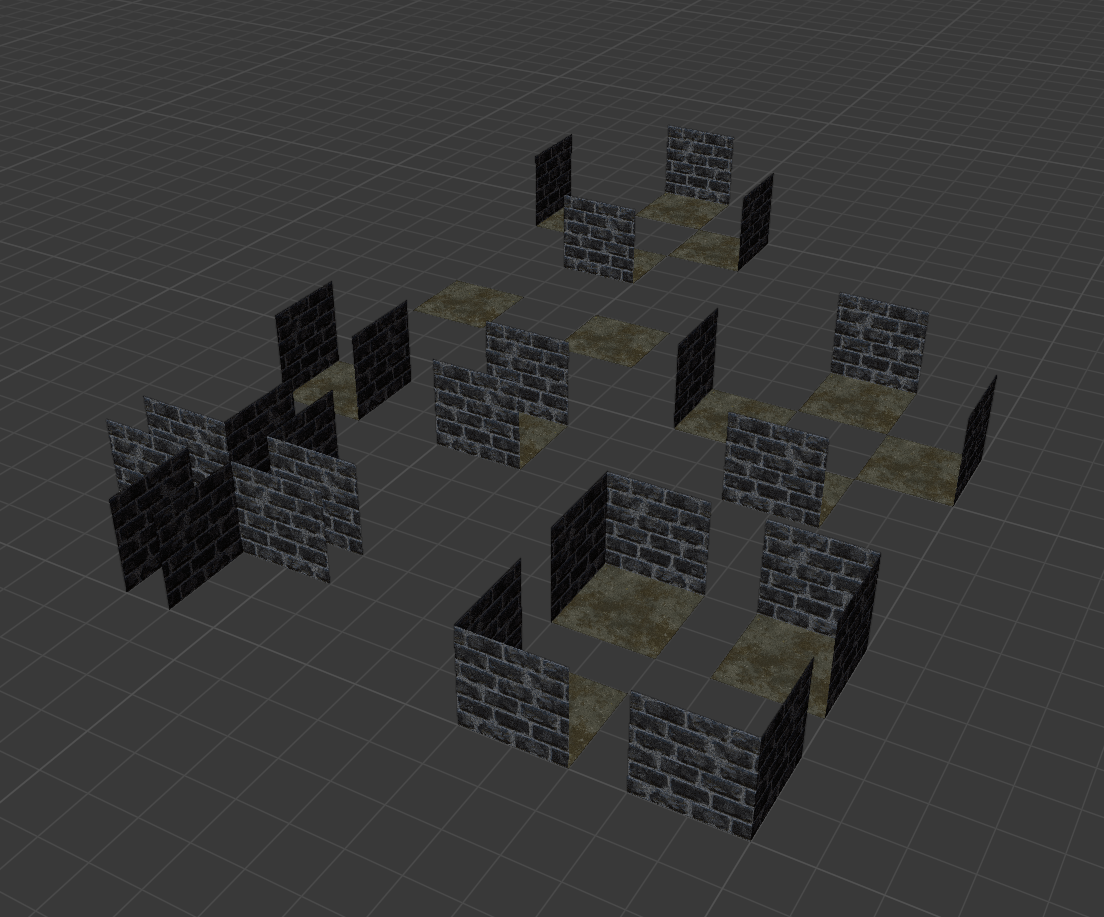
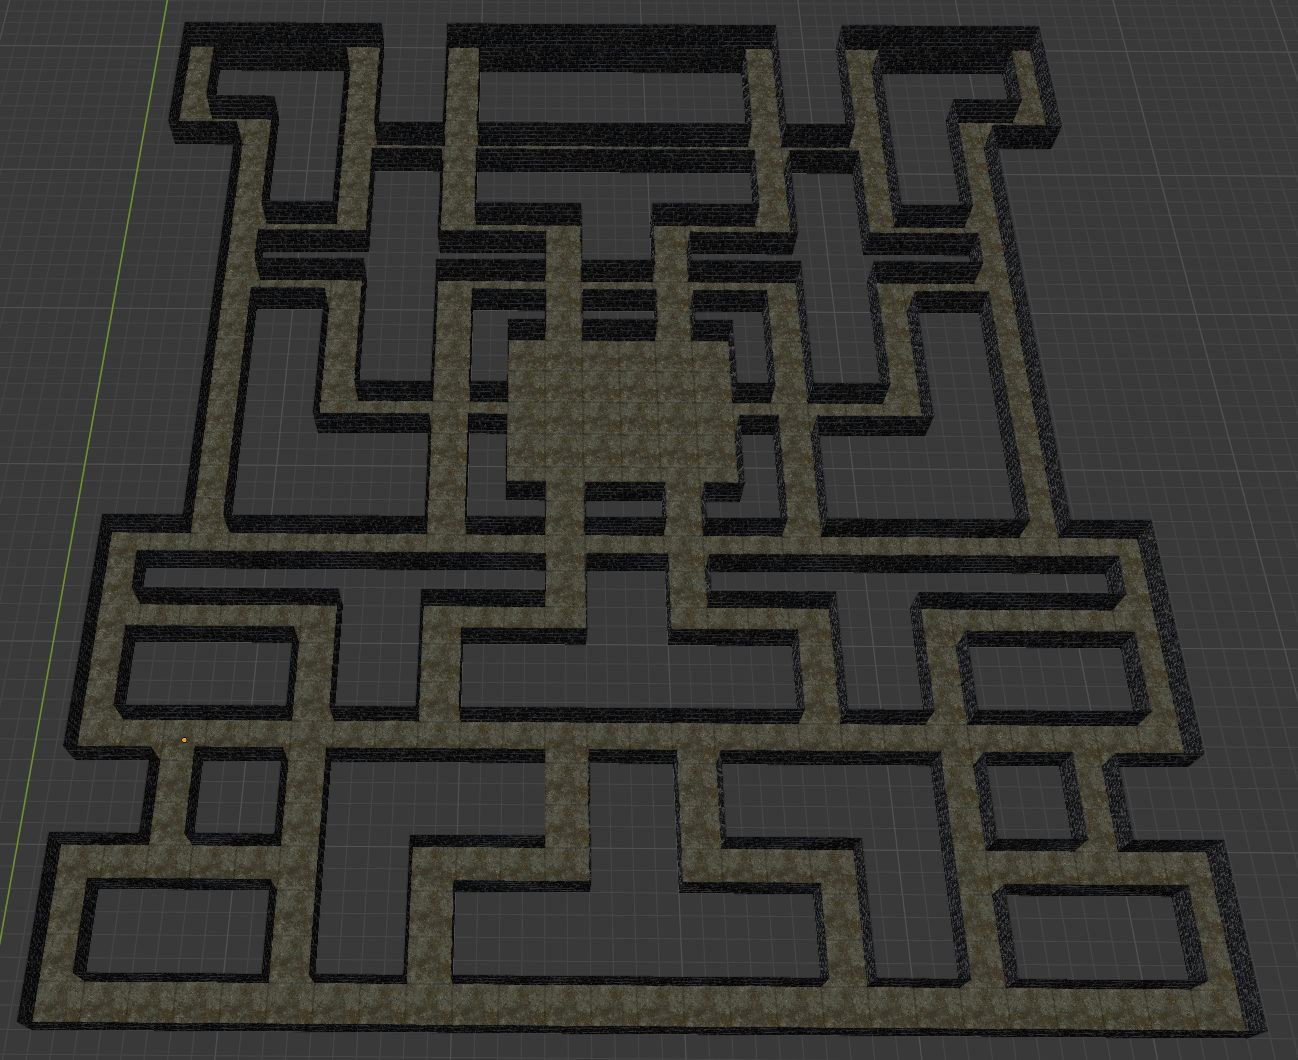
I originally wanted to recreate the original Pac-Man maze in 3D but I think I’d get in trouble so instead I found a fantastic Maze Generator instead.
I cropped the maze image in GIMP, loaded it into Blender as a reference image, created a mesh made of 28x31 quads, and aligned the quads to the grid of the maze.
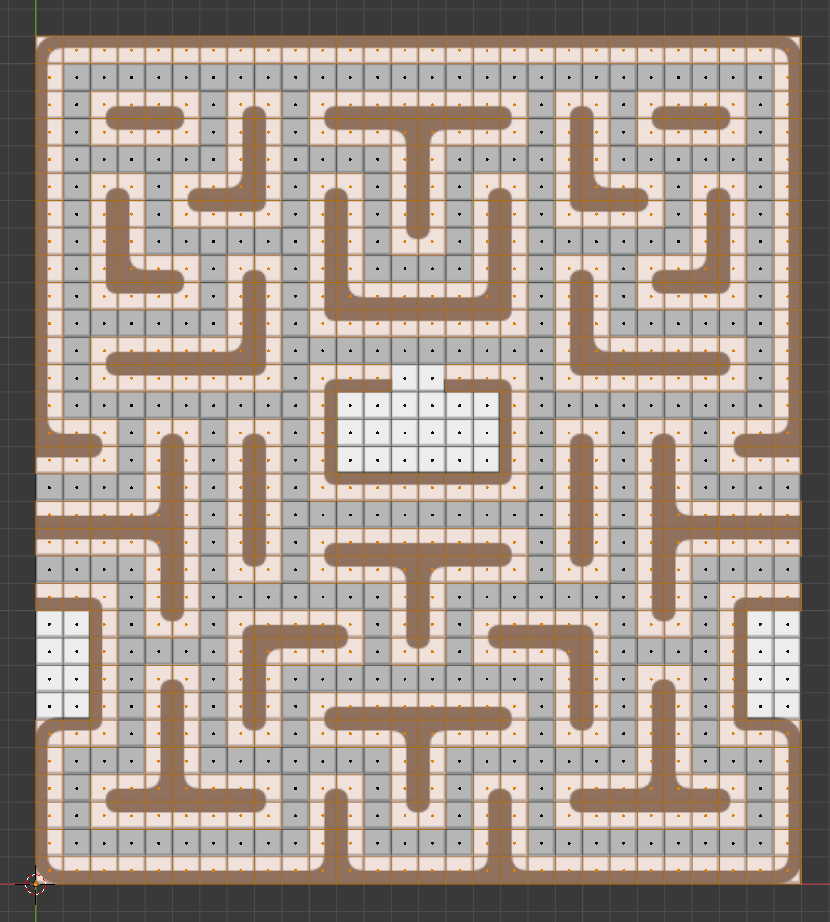
Then I selected the walls, extruded them upward, deleted any unnecessary faces, and textured the walls and floor.
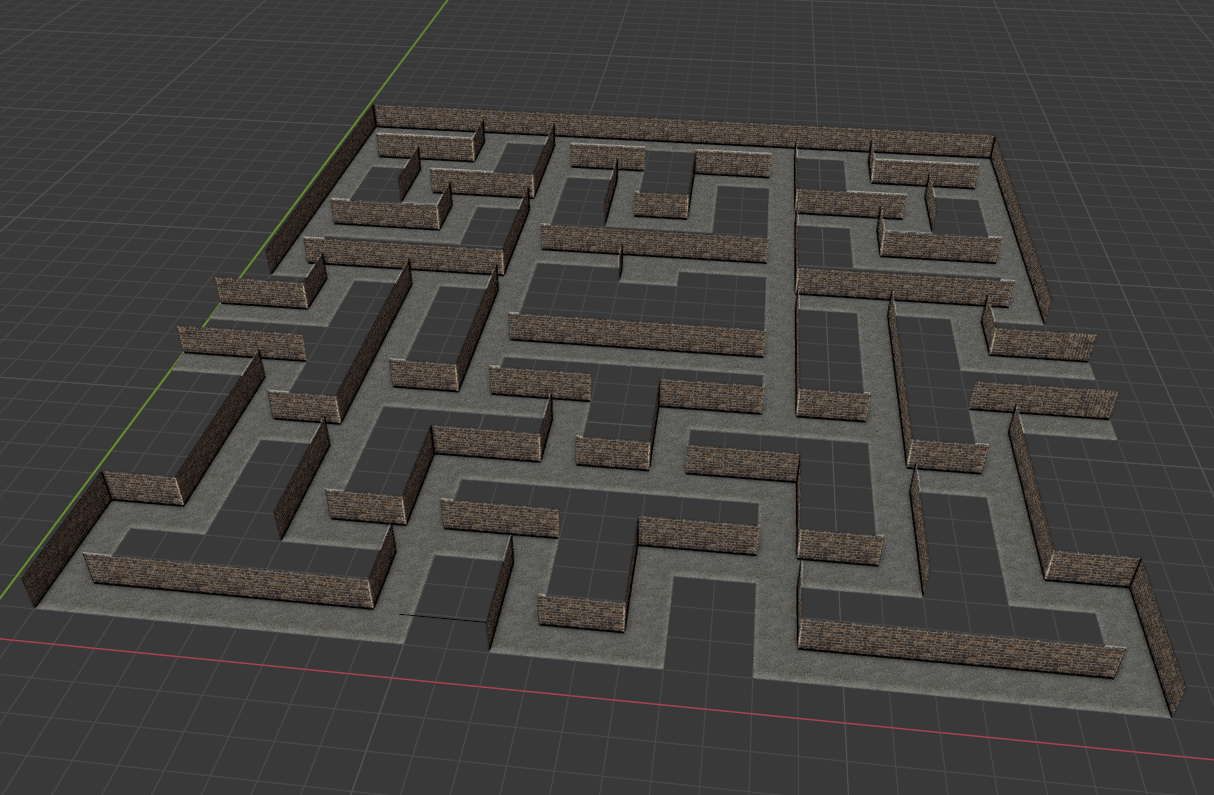
With my Blender export script I was able to export the mesh data and the textures, and load it all up in game.
Later I decided that I wasn’t happy with that maze and re-did it with a new layout which has a better feel to it.
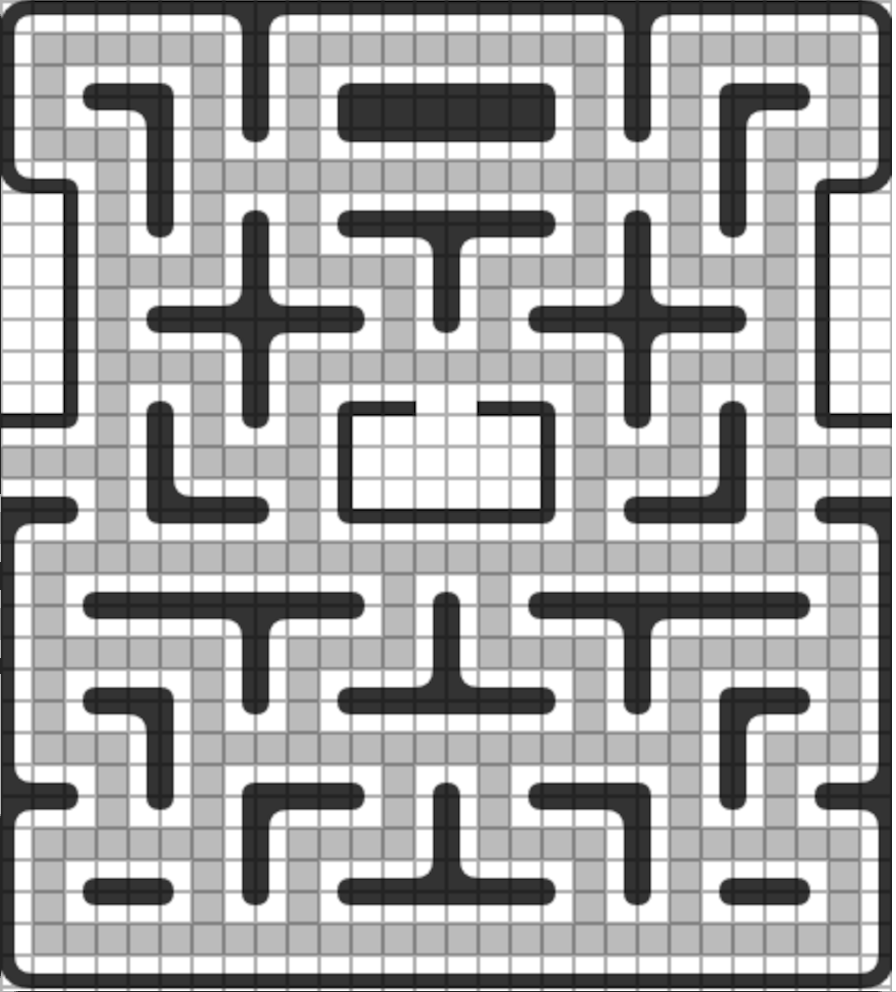
Initially it was one giant mesh but later I recreated it with a bunch of modular pieces because it made modification easier (I found that I was subtly tweaking the maze layout over time to feel better).
Models
I’ve had a fascination with 3D modeling since I first used Milkshape 3D as a kid. I had no idea what I was doing and unfortunately I never practiced enough to get good.
When I had the idea of making a game I knew I also wanted to create all of the assets, but I also knew that I’d have to work around my lack of artistic skills by making models low-poly and textures low-res.
As one example, I’ll talk about the development of the skull.
First, the modeling, which took six iterations before I finally got something I was happy with (and then a lot of tweaking even after that). I used reference drawings to get the general shape of it, but then modified it as needed to get the look I wanted.


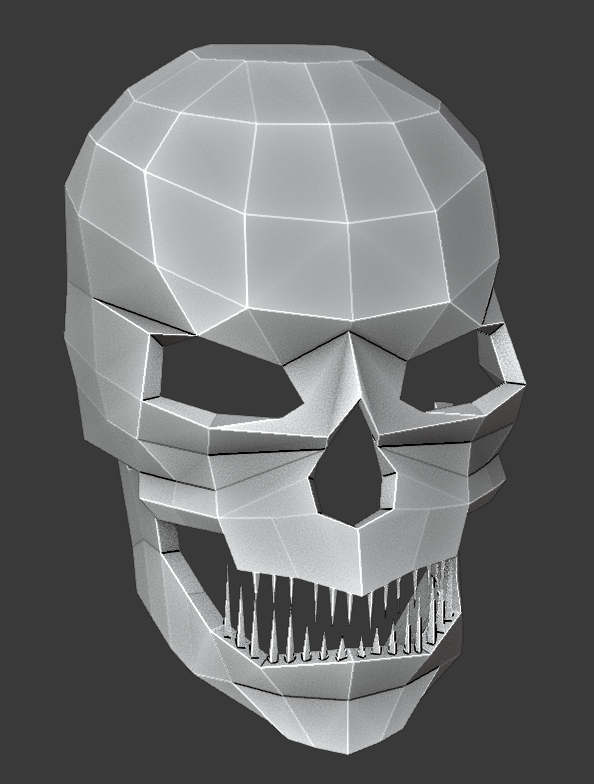
With the model in place, I needed to create a texture. I signed up for a trial of Shutterstock and downloaded a good sized version of this image of a skull.
First I replaced the white background with black and mirrored the image across the Y-axis to make the lighting even on both sides so that it wouldn’t look pre-lit at runtime.
To achieve the nostalgic low resolution texture look with the chunky pixels meant scaling the image down to a more reasonable size with the key restriction of no interpolation. By default GIMP wants to use cubic interpolation but to make sure everything stays chunky we have to remove that.
The final image size is 87x128 but I’ve scaled it 4x here so that it’s more easily visible.

The final step is getting the texture onto the model. I’m not good at UV unwrapping so I cheated and did a simple front projection, which meant looking at the skull from the front in Blender’s view and selecting “Project from View”. Then I just needed to tweak the UVs a bit to make it look decent.
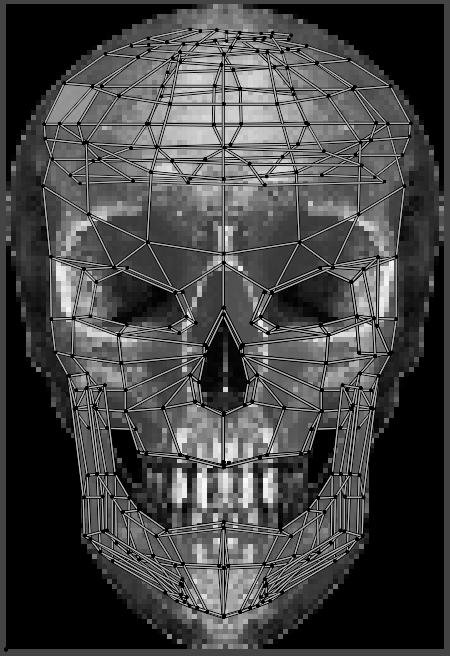
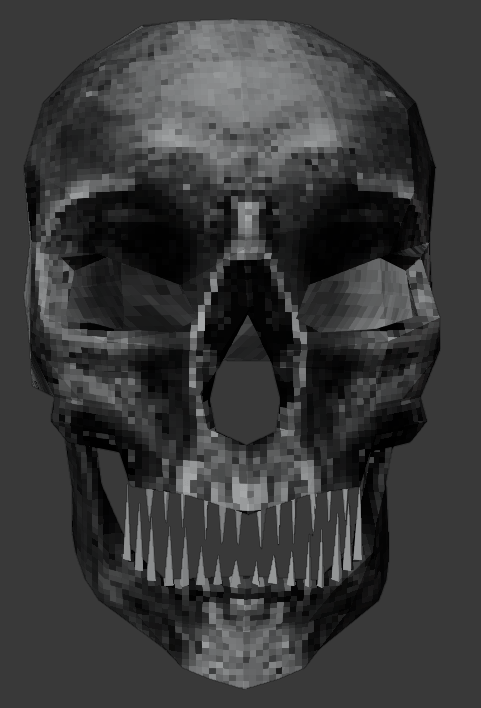
The problem with that approach, however, is that the sides of the objects end up looking bad because the texture is being projected from the front.
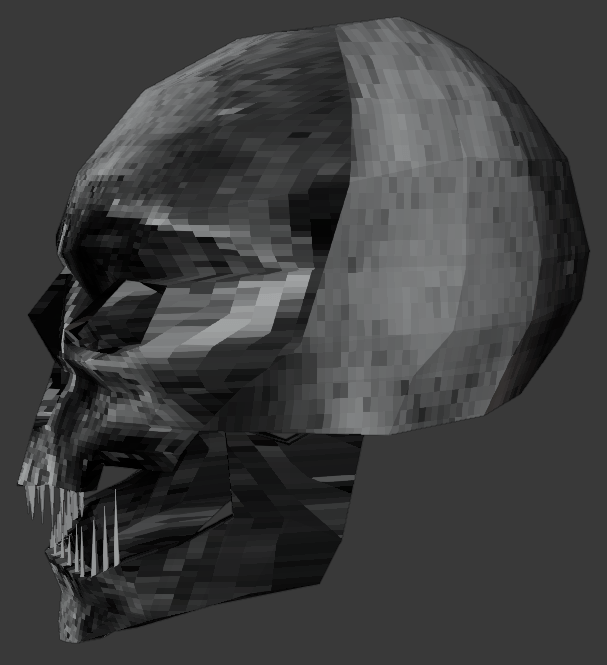
At runtime, though, with the dark lighting and the low-res rendering, it wasn’t really noticeable.
Sound Design
I think the art of sound design often goes unappreciated by players (myself included) which is unfortunate because a lot of the game’s atmosphere can come alive with good ambient audio.
My goal was to create audio that was creepy but fairly quiet and subdued. I found sound effects on websites like Zapsplat or created them myself using 1BITDRAGON, imported them into Audacity, and then tweaked them until they sounded “good”. This often took time because I didn’t really know what I was doing.
As one example, I’ll talk about the development of the background ambient “music”.
First I created a metallic droning sound in 1BITDRAGON by laying down some very low “Choir 2” notes in the C# Major scale, which created a very ominous sound.
I brought that into Audacity, resampled at 8000Hz, and then added some reverb and other mysterious Audacity effects until it sounded good.
Then I found a cool dungeon SFX from Zapsplat, added it to the Audacity project, resampled at 8000, slowed it way down, added reverb, layered on top of the ominous hum, and then made it all loop seamlessly.
It combined with some other modified effects like footsteps to bring more atmosphere to the visuals.
Game Design
The game design aspect of the project was my least favorite because it’s too loose and iterative. You can tweak things endlessly and it still doesn’t feel right. Or you spend hours or days on something only to discover it doesn’t work. You see something in your head, make it a reality, and then delete it all. It’s made worse when you’re solo because you have to write the engine code, write the gameplay code, and create the art, only to throw it away.
For example, I considered adding a minimap because I discovered it was frustrating to have a few coins left to pick up and unable to find them. Or for a ghost to pop around a corner right as you were entering it. But the original didn’t have a minimap (it didn’t need it) and it destroyed the horror aesthetic that I was so proud of.
The typical process for something like that would be to implement a minimap system and see how it feels. But implementing something like that is not simple and quick, and it’s painful knowing you may throw it all away at the end.
I now have a much greater amount of respect for game designers and gameplay programmers.
Last Edited: Mar 11, 2025